Project Releases
A Project Release is a package of files that you are ready to deploy. It is linked to a specific checkpoint and build. To create a release, you can click the "Create Release..." button in the project dashboard or releases page.
Release Candidates
In order to make a release, you must first have a release candidate. A release candidate is a checkpoint with connected OttoFMS build. These builds can be tested, validated, and then made into a release. To make a release candidate, you can click the "Create Release..." button in the project dashboard or releases page or you can create a release candidate when creating a checkpoint in the "Create Checkpoint" screen.
The builds created with release candidates are created with an auto-incrementing version number separate from the project version number. Your first release candidate will be build project-slug_1, your second will be project-slug_2, and so on.

Releases
Once you have a release candidate, you can make it into a release by clicking the "Review & Promote" button in the banner on the project Overview page.

This will take you to the diff screen, where you can see all of the changes that will be included in the release.
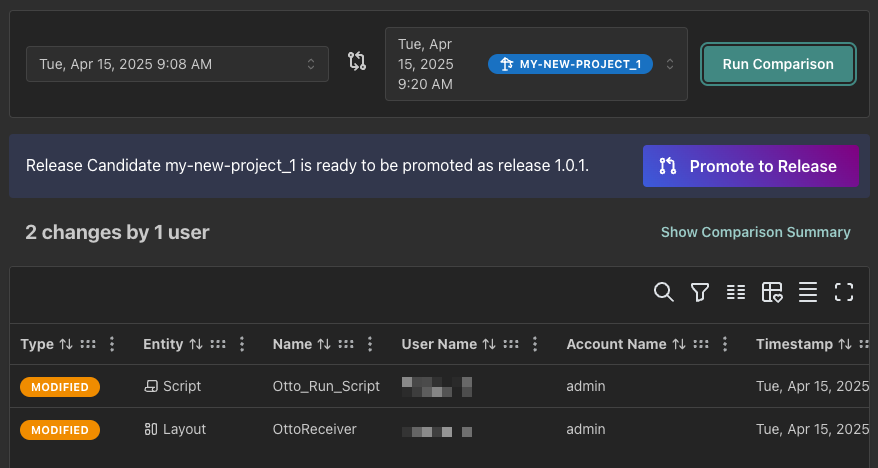
If you're happy with the changes, you can click the "Promote to Release" button to open the release creation screen.
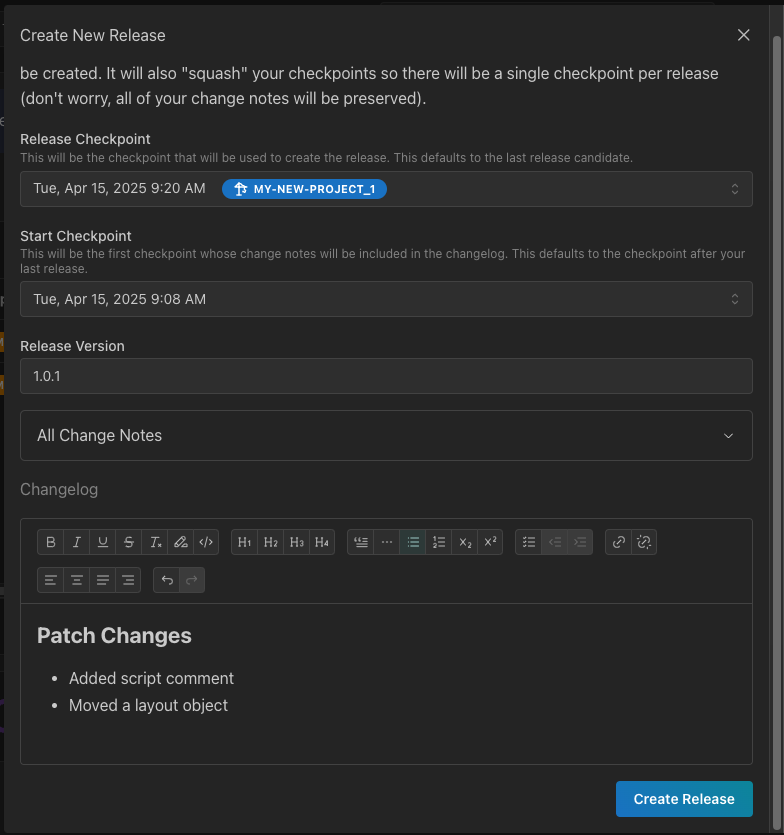
In this screen you'll be able to select the checkpoints to include change notes for, adjust the new project version (if necessary), and make any changes to the Changelog for this release. The new project version will auto-increment based on the change types that you have added to the included checkpoints. Once you're happy with your changes, click the "Create Release" button to create the release. Note: The changelog can be edited after a release is created.
When you click the "Create Release" button, the following will happen:
- A new release will be created in the Cloud Console with the new version number and the changelog you've just written.
- The project version will be incremented to the new released version.
- The release candidate checkpoint/build will be promoted to a full release. This makes the checkpoint immutable.
- The checkpoints since your last release will be "squashed" into a single release checkpoint. This makes the checkpoint history easier to manage and saves space on the server.
- You'll be redirected to the releases page to see your new release.
Using Releases
Once a release is created, its ready for deployment! To use a release in a deployment, all you need to do is select the release build as the source build in OttoDeploy, and then deploy as normal. We're planning on integrating the deployment process more fully in the Cloud Console in the future. For details on using OttoDeploy, see the OttoDeploy documentation.
Showing Releases to Customers
Once a release is created, you have the option to publish the changelog to the releases page. This will put your release changelog on a publically accessible url that you can share with your customers, embed in a web-viewer, or use in any other way you'd like. You can publish the changelog by clicking the "Publish Changelog" button in the release card on the releases page.
The url for the changelog can be copied from the release card, and will look like this:
https://console.ottomatic.cloud/releases/[organization-slug]/[project-slug]/[release-name]
The "release-name" is the version of the release (ie. 1.0.0) or "latest" if you'd like to always display the most recent release. There is also a page with all of the published releases for a project at:
https://console.ottomatic.cloud/releases/[organization-slug]/[project-slug]